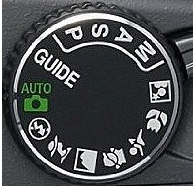
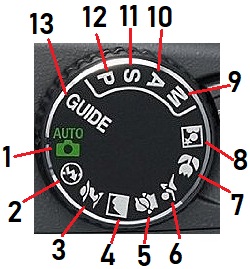
In the previous text you could learn some more details about all shooting modes that you can find on your camera’s mode dial. In today’s lesson we will dive deeper into three most used modes – Manual (M), Aperture priority (A or Av) and Shutter priority (S or Tv). If you are still shooting at Auto mode, you will need some time to switch to one of these modes. You will need to practice a lot, to experiment, and to learn how each of these settings affects your final image. After a while you will catch yourself looking the world around you differently, thinking which aperture and which shutter speed would be ideal for the scene you are looking at just now. Don’t worry, this is absolutely normal after you spend enough time with your camera 🙂
Is my photo exposed correctly?
Before we start with the individual modes, let’s take a look through the viewfinder or on the LCD screen. You should see something like this:

This scale shows how exposed your image will be if you press the shutter button right now. In the picture above you can see that the arrow points to +1, which means that your photo will be slightly overexposed (too bright). If the arrow goes to the negative numbers, that means that the photo will be underexposed (too dark). When the arrow is exactly on 0, the photo is exposed perfectly. If the arrow went too much to the right, you can either lower your ISO to reduce the sensor’s sensitivity, or you can use faster shutter speed or narrower aperture, so that less light can come inside. On the other hand, if the arrow is in the left part of the scale, you should increase your sensor’s sensitivity (increase ISO) or let more light in (by using slower shutter speed or wider aperture). So the point is, whatever setting you choose, you should always try to have this marker in the middle if you want your photo to be exposed properly. Of course, photography is an art, and in art there are no rules. But my opinion is that you should first learn some “unofficial” rules, and after you learn them and learn how to create photos which adhere those rules, then you can start breaking them. But always be sure that you are breaking the rules on purpose, not because you don’t know how to use your camera.
What about ISO?
Shutter speed and aperture opening will determine how much light will physically get to your sensor. ISO sensitivity will determine how much your sensor will be sensitive to that light and how bright your photo will be for a given amount of light.
Your DSLR camera will offer you two possibilities – to have a fixed ISO, or to set it to automatic mode, with certain limits.
When you press the Menu button on your camera you will see five different categories. The second one is the Shooting menu, which contains the ISO sensitivity settings. Navigate to that item and press the OK button. You will see another screen, where you can set basic ISO sensitivity, and choose whether you want to have Auto ISO sensitivity control.


If you turn this option on, you will be able to choose maximum sensitivity, and the minimum shutter speed (so that you can be sure that the shutter speed won’t go below certain level if you plan to shoot handheld). If auto ISO sensitivity control is turned off, your camera will stay at the basic ISO level.
Now we can go on and explain the three shooting modes.
Shutter priority mode (S/Tv)
In this mode you will be able to set the shutter speed by turning the wheel on your camera. The aperture will be automatically set, depending on the amount of light, so that the exposure meter will be in the center of the scale. ISO sensitivity will be either fixed or set automatically (if you chose that option as described in the previous step). This mode is useful when you are shooting a scene where timing and exposure length is crucial.
On one side, you will set very quick shutter speed if you want to catch the peak of action and to “freeze” it in time. It could be a basketball player in the middle of dunking, or a kid playing with a friend, or your cat which is jumping to catch the string, or a bird in mid-flight, or the waterfall in which you want to see razor sharp water drops…

On the other side, you will need a slow shutter speed if you want to catch the flow of water and to give it that silky look, or light trails on a road in the night, or if you are shooting stars in the night sky, or if you want to create a sense of motion using the technique known as “panning” (more about that in one of the later posts)…

If you are shooting handheld, your shutter speed should be not slower than 1/50s. In my personal experience this is the lower limit to create a photo without blurriness caused by hand shaking. Of course, this stands for shooting still objects and people who are posing for a photo. If you are shooting moving subjects (people walking or running, cars, animals, children…), you will want even faster shutter.
Aperture priority mode (A/Av)
This mode will allow you to determine a fixed aperture opening, while the shutter speed will be set automatically. ISO can again be either fixed or set to automatic. This mode is useful when you want to control the depth of field in your photos.
If you open your aperture as much as possible (i.e. if you set a small f-number), you will have a sharp focused subject with blurred background. This is useful for taking portraits, and for close-up shots, for example of flowers or small objects. The depth of field will be very shallow. The larger the aperture, the stronger the blurriness of the background your photo will have, and the smaller depth of field will be. To achieve this effect it is also important to be as close to your subject as possible.
On the other hand, small aperture (large f-number) will give you a large depth of field, so more objects both in the foreground and in the background will be sharp. This is useful for landscapes, when you want to have as much of the scene in focus as possible.
Manual mode (M)
This mode is giving you the full control over all the settings that your camera has to offer. In this mode you can do the fine tuning of all parameters and nothing will be overriden.
Manual mode can be useful for example when you are shooting stars. You want to open the aperture as much as you can, to let in as much light as possible. Your shutter speed will depend on the focal length of your lens according to the “500 rule” (more on that in next posts). To put it simple, you don’t want shutter speed to be too fast because there will not be enough light, but also not too slow because stars movement will be caught and the stars will turn from dots to trails. Your ISO sensitivity should be high enough to capture tiny stars, but not too high so you won’t have too much noise. If you are shooting in one of the semi-automatic modes, your camera might get confused and set different configuration, but can also determine that there is not enough light and won’t even fire. We will talk more about stars photography in the following posts. However, this is one of the situations when you want to have the full control of your camera.
The other situation is when you are shooting people indoors, where the lighting is not so good. You don’t want your ISO to be too high, to prevent excessive noise. Your shutter speed should be 1/60s or faster, to prevent blur. You might not want to open your aperture all the way because you want to have a bit larger DoF, so you will narrow it down a little. If you were shooting in A or S mode, your camera might make a different decision, and you don’t want that. So you will put your camera in the M mode and tell it which settings you want. Remember, you are the artist who creates a picture, not the piece of hardware in your hands.
Manual mode is also useful when you want to experiment with different exposures. Let’s say that you have set your ISO to 100 and you can’t go any lower. Your aperture is f/2.8 and you decided that is just the perfect DoF for the given situation. Your shutter speed is 1/125s and you take a shot. The exposure is jut perfect, but you want it to be a bit darker, because you want to create a mysterious mood in your photo. As we have already said, can’t decrease your ISO and also you don’t want to close the aperture because you will lose that blurry background. So you will increase the shutter speed to 1/250s, and if that is also not dark enough you will proceed to 1/500s and maybe even to 1/1000s. If you were in Aperture priority mode, your camera would determine the “ideal” shutter speed for you and you wouldn’t have any chance to improvise and to give your personal touch to that photo. In Manual mode you are able to do anything you like and to express your vision of the scene.
Conclusion
My mission here is to help you get to know your camera better and to understand how, when and why can you use different shooting modes and settings. In 90% of situations I tend to use either Aperture priority or the full Manual mode, and in other cases I use shutter priority. This is entirely up to your preferences and to what you are photographing. I am not trying to persuade you to always use the Manual mode, because I am aware that many photographers in many situations might achieve better results with one of semi-automatic modes, or even in full auto mode. Or at least there will be situations when Shutter priority or Aperture priority will give you great results, without you worrying about all the other settings. But it would be a shame that you own an expensive state-of-the-art DSLR, and not make the most out of its potentials.
If you want to master the Manual mode, you should be prepared for a lot of theoretical learning, trials and errors, experimenting… No matter how many texts you read and how many photographers you talk to, you will never really start learning if you don’t take your camera and get outside to take some photos. Only then will you see how your camera acts, how the different settings affect your photos and what you can do to make them better, or just different. And don’t be afraid to change the settings, you can’t break a camera by doing that :).
Another topic is coming soon. Until then, share this post if you like it and if you think that someone else could benefit from it. Also, leave a comment and tell me what you think.
See ya! 🙂