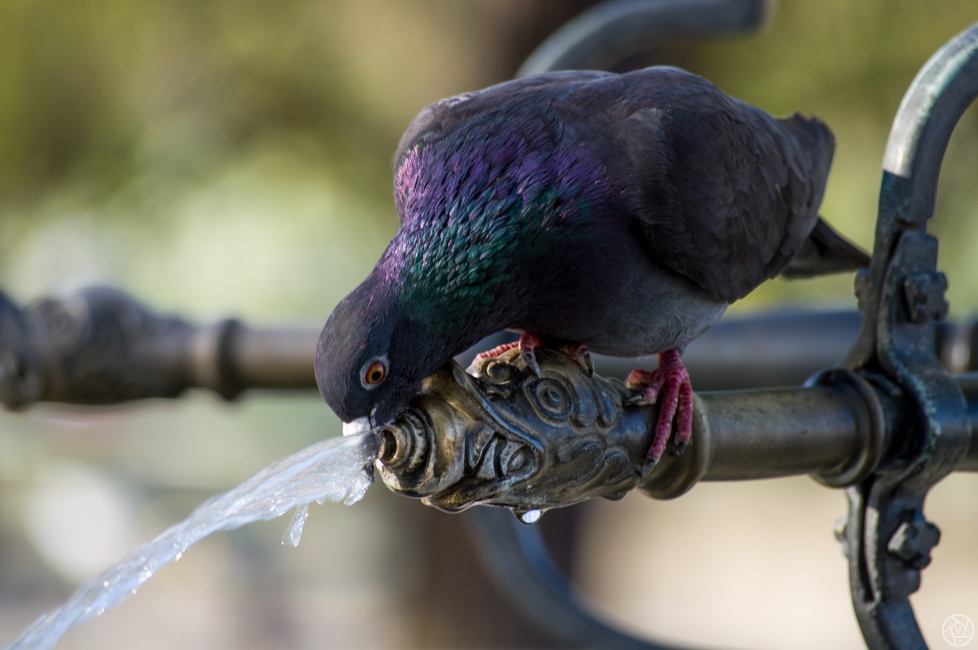
Today we will talk about making a frame inside a frame. “Wait, what?“, you ask. Well, it’s simple. There is one rectangular frame that you always have, and that frame is made of your photo’s borders. Often it would be a good idea to create another frame inside of it, which will contain your main subject(s). That “inner” frame could be made of whatever you find when taking a photo. You can use tree branches, bridge arcs, doors, windows, or anything else. You just need to position yourself so that your subject will be visible through that frame and you just point your camera and shoot through it.
I will share some of my photos, it’s always better to learn from practical examples 🙂
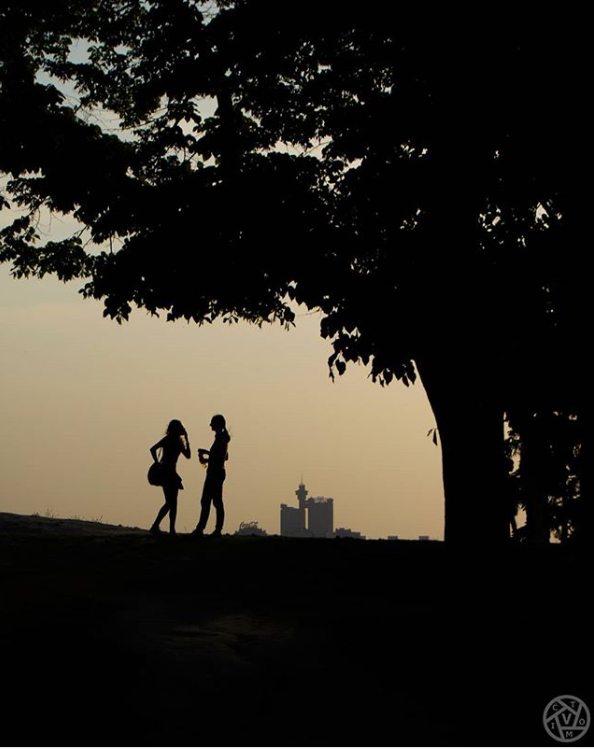
This is a silhouette of two girls talking to each other. This photo might be interesting, but… It looks somehow unfinished, I have a feeling that something else is out there, that I don’t know the whole story.
This already looks better to me. Now there is a border around the girls, and I know that they are the main focusing point of the photo, there is nothing else around which is more important. This was the final version of the photo, but when I look at it now I feel that there is too much black area, so I might just re-crop it:
Now it looks perfect to me. The girls are placed using a rule of thirds. Maybe you can also imagine a golden spiral starting from the upper left corner, swirling around and ending up just at the place where the girls stand. And I still have a nice frame made of the ground and the tree. Of course, it is not mandatory that the frame has all four sides.
Let’s have a look at the next example:
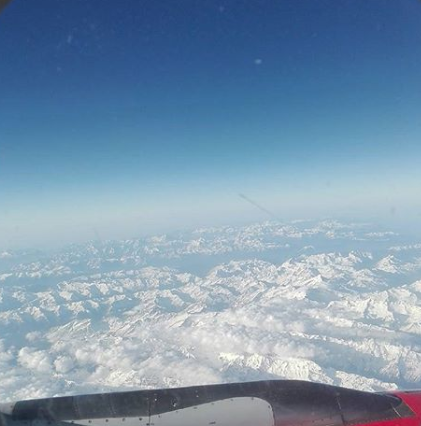
A photo of the Alps, taken through the window plane. Beautiful sight, it really is. There is also a part of the engine visible, so that the viewer knows that this was really taken from an airplane (wow, look at me, I was flying and I bragged about it on social networks!). The sky is ice and blue, while the white mountains make a nice contrast… But do you really like this photo?
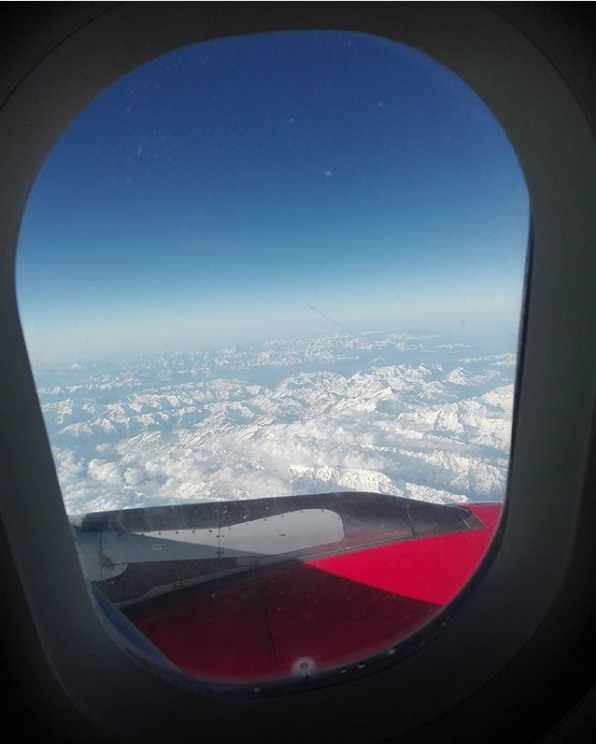
Much better, if you ask me. Not only that a viewer will now have the same perspective as I did when I took the shot, but the main scene will be somehow surrounded and will be one single entity. In the first version I wouldn’t know where to look – should I concentrate on the sky, on the mountains, on the engine…? Now I know that the whole scenery and all of its elements make a single image which should be enjoyed wholly.
The last one:
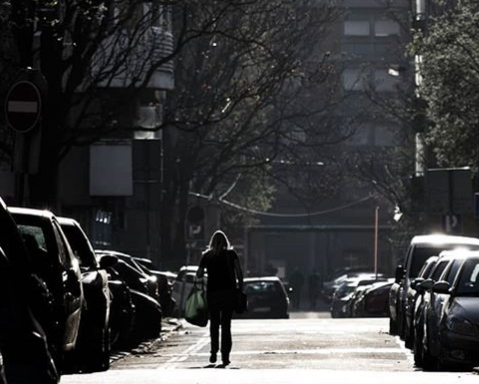
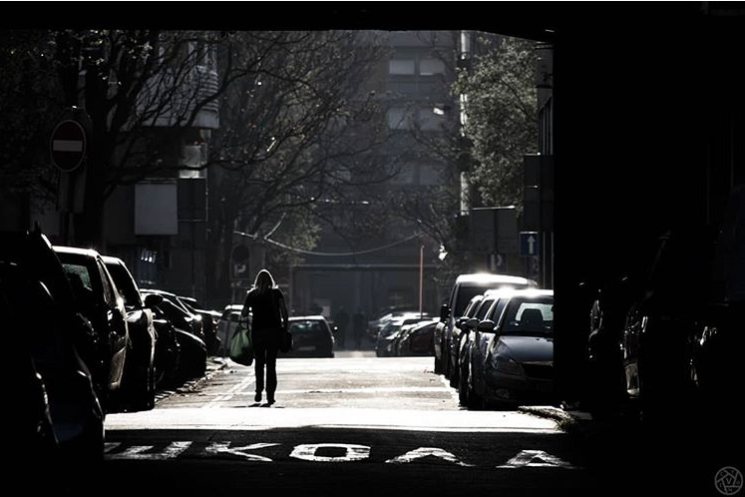
A woman is walking down a sunny street… well, ok. Good for her, right? But let’s take somewhat wider look:
Now we have totally different story behind this image. We know that she has passed through a dark passage, we have a strong contrast. We can also see the label on the road, which says “SCHOOL” (in Serbian), so that also adds up to the all the different story possibilities that a viewer has. Besides that, we got the additional sense of depth, with some barely visible cars in the shadow, which form a nice leading lines together with the cars in the sun, and they are leading our eye to the distant point where this lady is headed. And some additional black border on the right side created a different composition so that the woman is right in the first third of the photo.
You know what’s next. You should take your camera, go outside (or stay inside if you have enough material for photography), and try to make some photos which will have a frame inside a frame. Come back after that and share your thoughts in the comment section.
Here we are at the third part of our photography rules collection. Today we will talk about a couple of things. For the beginning, let’s talk about how and why you should fill the frame.
It’s all about… well, about filling the frame :). You want to zoom in as much as possible (either using the zoom capabilities of your lens or by walking closer to your subject), so that you don’t leave much (or any) empty space around it. Your whole frame should be filled by your main subject.
This rule is important when you are taking a photo of a single subject. Maybe it is a flower, or your pet, or a human portrait… The flower is small anyways so you don’t want much of its surroundings included, because it will only distract a viewer from the flower itself. The same is with your pet. Zoom in and make that cute dog really be the main star of the photo! When making portraits of people, especially if they have interesting face contours and details, it’s worth leaving everything else out of the frame and making that wrinkles or that scar or that beautiful eyes stand out, because after all that’s who your subject really is. Be careful though, and don’t crop your model too much. I will make another post about cropping so you could see how you should and how you shouldn’t crop a portrait.
But then again, you might have more than one subject. You might be photographing your plate with several kinds of food, or a basket full of different fruit, or maybe two people holding hands… It would again be better to zoom in and even to crop a little bit, so that only the food stays in the photo (or the fruit or the two hands).
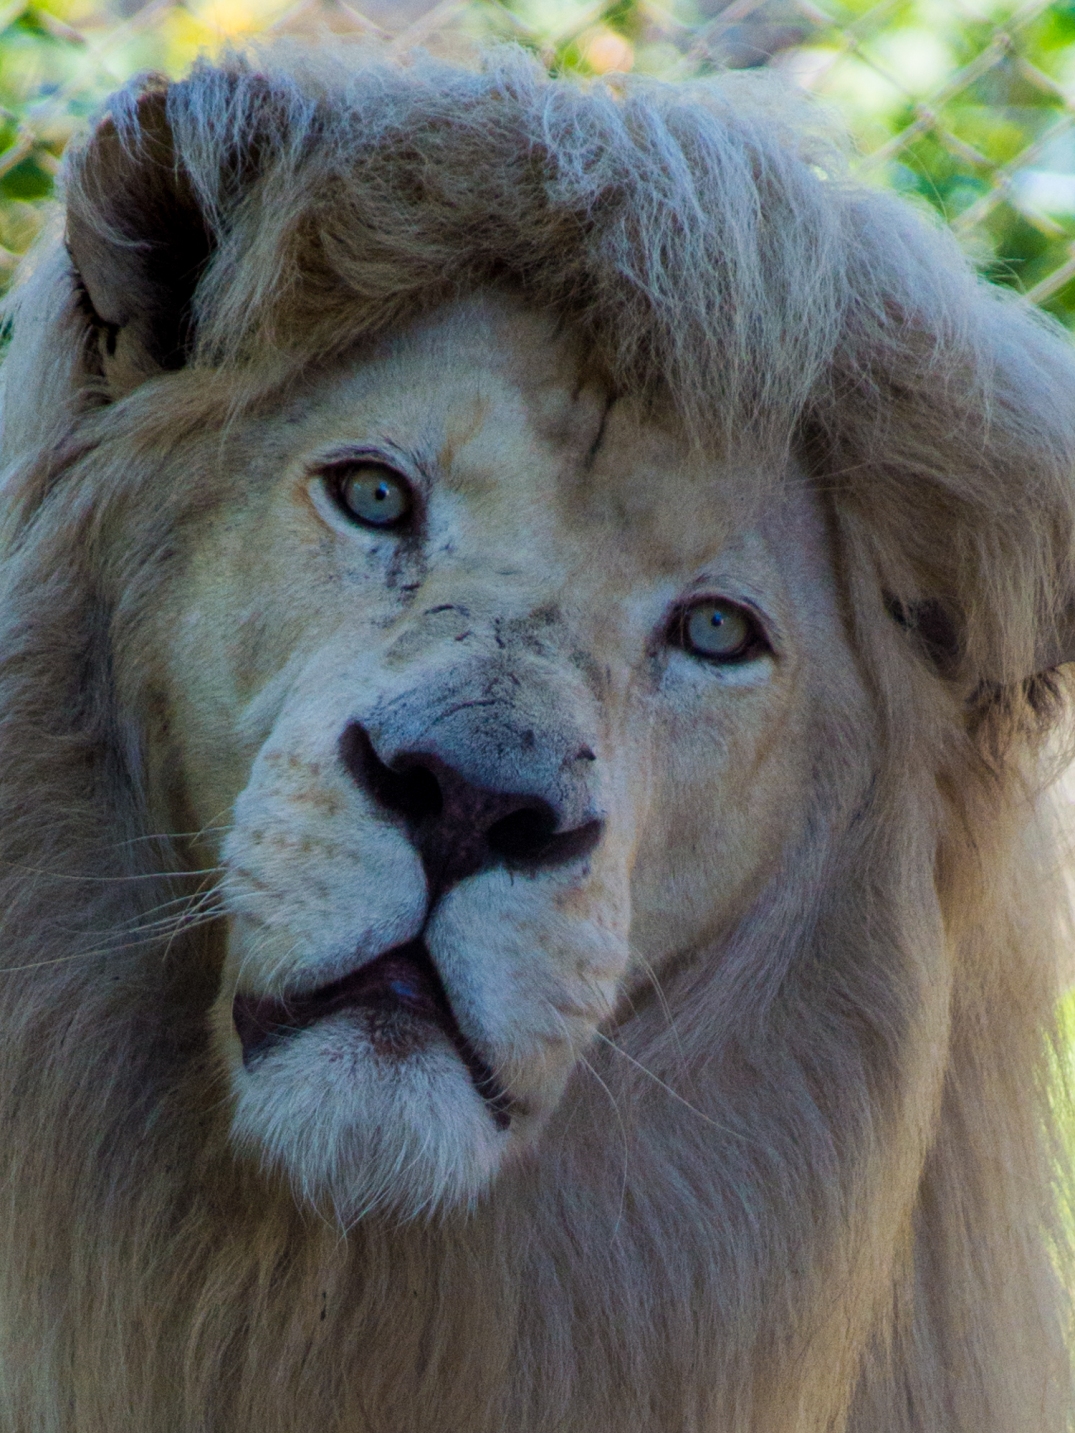
Let’s take a look at an example. What do you think about this photo of a lion?
Ok, it’s an interesting lion, he has a nice “haircut”, looks curious, and he’s looking straight into the camera. Not bad. But there is much more in this photo, there is too much information which distracts a viewer’s attention. Those rocks at the bottom, then the ugly fence behind the lion, more rocks in the background, some grass, some concrete, then some flowers which are also a bit distracting. The lion is placed in the very center of the frame, like the rule of thirds doesn’t exist at all… Actually, I’ll be honest, this is a photo that I’ve published on Instagram a while ago and at that time I thought it was really great.
Now take a look at this one:
Looks better, right? I want my viewer to focus on the lion’s head, and I also included a bit of its magnificient mane. I placed its eye right in the intersection of the lines which split the image into the thirds. I removed all of the useless information from the background. No more fence (ok, a little bit in the top right corner, but maybe you didn’t even notice it), no more rocks, concrete walls, flowers… Only the portrait of this beautiful lion in all its glory.
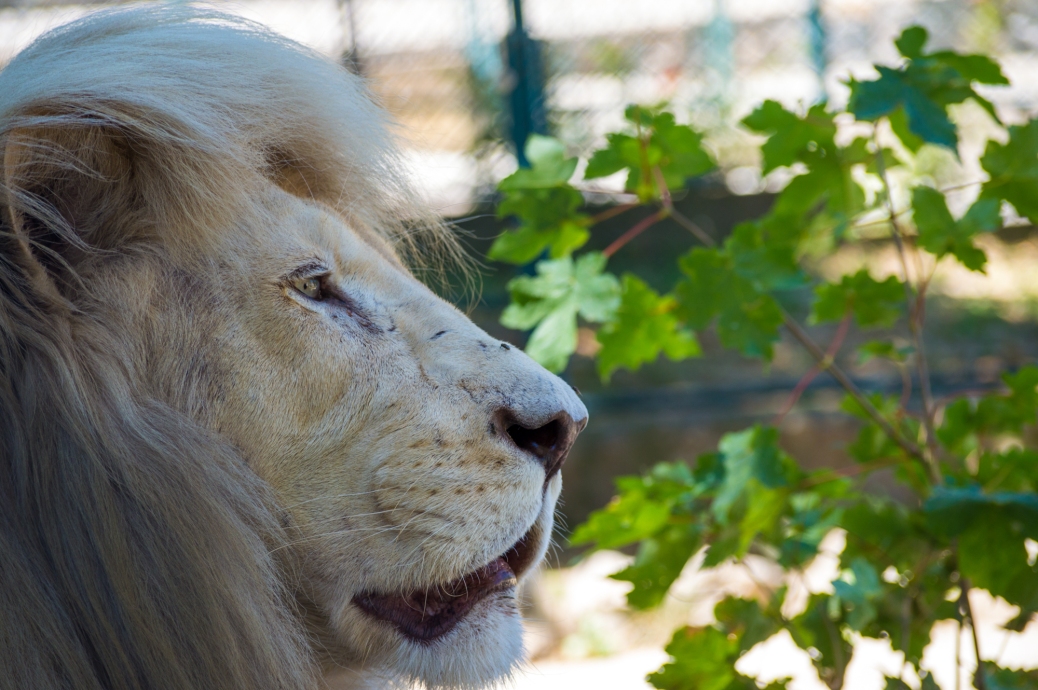
The other rule I want to mention should be applied in cases when you don’t fill the whole frame. That rule says that your subject should face towards the center of the photo, and not outside of the photo. Let’s have a look at another photo of the same lion:
It seems logical, right? The lion is looking “into” the photo, everything is in harmony. Can you imagine if the camera was moved all the way to the left, with the lion’s head on the right side, looking outside of the photo? It would look weird, right? What is he looking at? Why is that not in the photo? Why is he trying to “escape” the frame? It’s just wrong!
To be honest, I was trying to find a single photo in my portfolio where the subject is facing outside the frame, but I couldn’t find it, because it just feels wrong to me to take that kind of photo 🙂
That would be it for today. In my opinion, after these few lessons you can already grab your camera, go out and start taking photos while trying to apply these rules. And don’t worry, this is not the end of the lessons, in a few days you will be able to read about some more rules. I just want you to start applying what you have read so far, because it’s the best way to learn.
Give me a comment – what do you think? Are you already using these rules in your photos? Share this text so your friends can also see it. And I’ll see you soon with new rules 🙂
In the previous post we started talking about some composition rules and principles in photography. We covered the rule of thirds, the golden ratio and the golden spiral. Following them will give your photography more dynamic look and feeling.
The next principle that I’d like to talk about are the leading lines. When creating a photo you should include some lines in it (either straight or curved), which will lead the viewer’s eye “into” the image, all the way to the main subject. Those lines should ideally start from one of the corners of your image (I prefer the bottom left corner), and then make their way to the subject. You can use anything for the leading line – a road, a fence a rope, a plane exhaust gases trail, a river… anything that can fit into your frame.
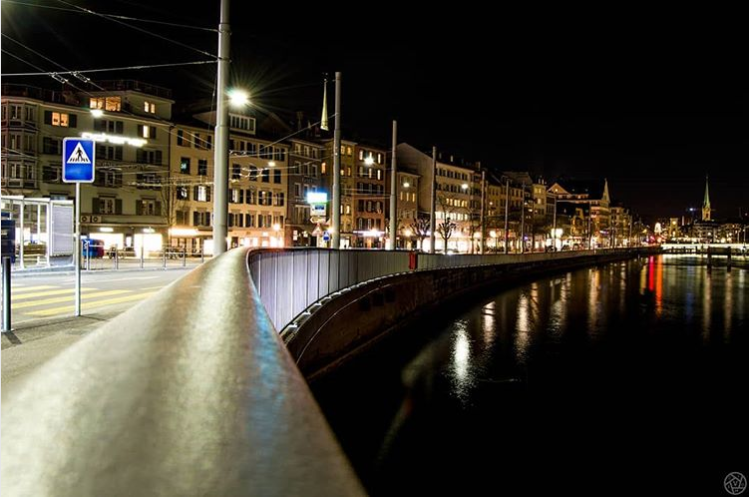
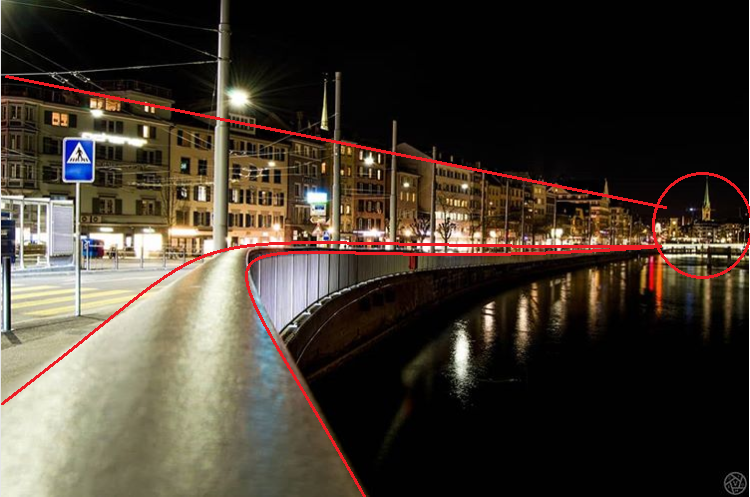
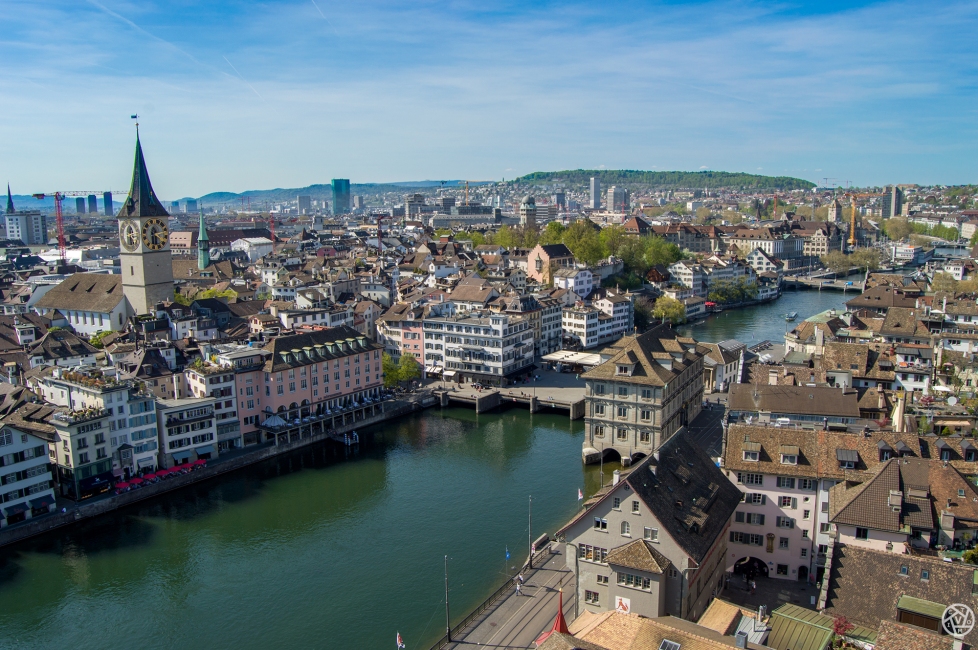
Take a look at this photo of Zürich:
Do you see where I was trying to lead your eye? You will start from the bottom left corner, and go along the rail all the way down to the church tower and a nicely-lit bridge over the Limmat river. There is also an auxiliary line which is formed of the rooftops, and helps your eye go to the right and not wander to the not-so-interesting black sky.
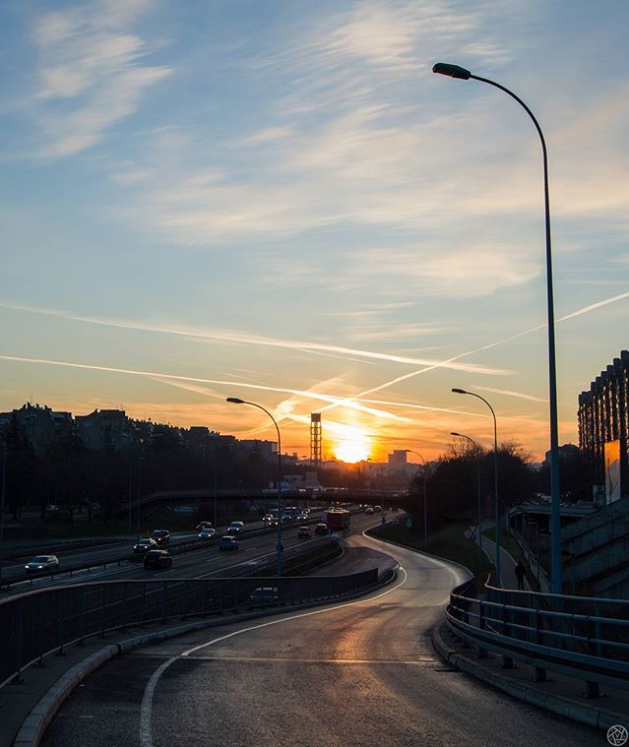
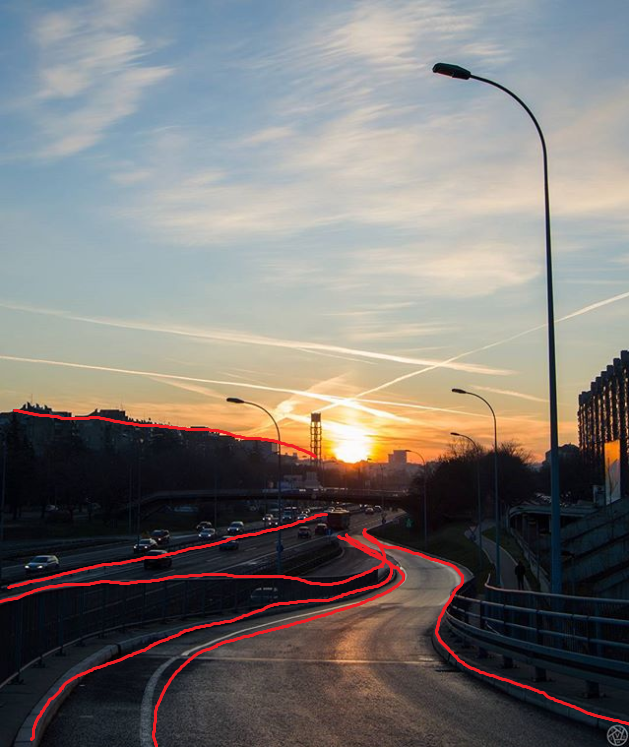
Let’s take a look at another one. I wanted to take a photo of a rising sun, but also I tried to compose a photo so that there will be something in it which will lead you to the sun itself.
So there is a highway and a connecting road, which converge just a little bit under the place where the Sun is located. And also some rooftops from the upper side.
Did you already take some photos which follow this principle (either willingly or just by accident)? Leave your thoughts in the comments, share this post if you like it, and see you soon with another photography rule which is meant to be broken (at the end of this series). Bye bye 🙂
Now you think: “Wait, what…? I thought that photography is the art and that it can’t have any rules. Then you tell me that there are some rules after all… And just when I have finally accepted that, you want me to break them? What the heck?“
And yes, you are right about everything. Photography really is the art, and whatever you create will be great, because it is your unique way to express what you see. Noone can tell you that your photo is bad because you broke some rule(s).
But ever since the ancient times the artists (painters, sculptors, architects…) knew some things about the human eye that you should also know and maybe (just maybe) you should try to create your photos according to those facts. So we’ll just call these things – rules (because it’s easier and faster to say or write “rule” than “a fact about a human eye which will make you consider the way of creating photos so that they can become more appealing to the viewer“).
And finally, when you learn these rules, you will learn how to break them on purpose, in order to make your photo even more appealing than if you were following the rules. Simple, right? 🙂
I decided to write about these rules today because I feel that the previous lessons were just the right amount of technical things that you, as a beginner, should know about your camera. Right now you know how to switch to a mode that you want, which mode is better for which occasion, how can you determine if your photo is well exposed… and regarding the technical stuff that should be enough for the start. In a while we will talk about some other settings which will give you even more creative freedom and will let you further improve your photography skills.
Ready? Great! Let’s start with the rule #1…
Rule of thirds vs. Golden ratio
You have probably heard about these things a thousand times. What are they and how can you apply them?
For the rule of thirds the point is to imagine four lines dividing your frame into thirds, both horizontally and vertically (on modern cameras you can even see those lines while taking a photo, you don’t have to imagine them). Then you should try to place the most important object of your photo on one of the four points where those lines intersect.
This photo was shot while respecting the rule of thirdsThe sun, the tree, and the path are placed either in one of the four intersecting points, or along the dividing lines
Also, if you place your subject in the dead center the photo will look static, maybe even boring. If your subject is slightly off the center, it will create the sense of movement, and the photo will be more dynamic. Take a look at this photo which was cropped in two different ways for the purpose of this lesson:
Looks too static, right? Like the man is stuck in the center.Looks like the man is moving towards the center (and he really was)
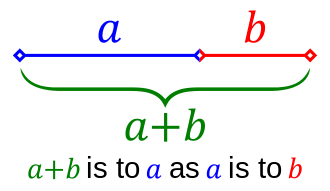
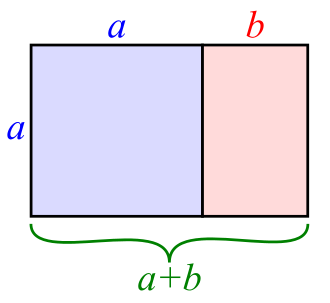
There is another similar rule which propagates the use of golden ratio. Two numbers a and b have golden ratio if their ratio is the same as the ratio of their sum to the larger one of them: (a + b) / a = a / b = ϕ
In geometry we can represent that ratio using a single line, or a rectangle:
So far you can see that the golden ratio divides a rectangle almost in the same place where its third would be. So what’s the difference?
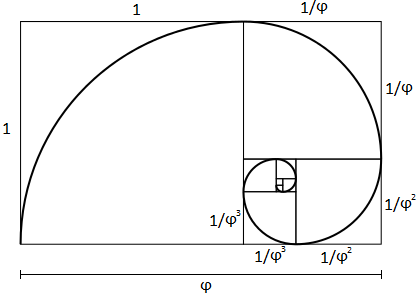
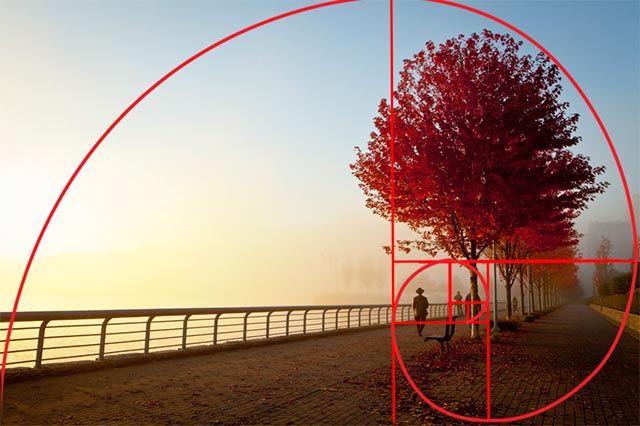
There is also something called golden spiral. In geometry, this is defined as a logarithmic spiral whose growth factor is ϕ (the golden ratio):
You can rotate or mirror this spiral anyway you want. Then you should try to make your composition so that the spiral is leading the viewer’s eye all the way down to its center, where your main subject should be placed. Take a look at the photo that I found on this site, which demonstrates the use of this composition technique:
These rules are not something that I came up with, nor they are the invention of some modern fancy photographers. They were used even by ancient artists who found out that the human eye will not focus on the center of an image, but instead it will roam around and will most probably focus somewhere slightly off the center. Therefore the picture with the most important elements placed in the thirds or in the “golden” areas will look more beautiful to the viewer.
Did you already use one of these techniques? Did you see the difference? Leave a comment and share your experiences. And of course, share this text if you like it 🙂
In the next post we will continue with the rules which are meant to be broken 🙂
In the previous text you could learn some more details about all shooting modes that you can find on your camera’s mode dial. In today’s lesson we will dive deeper into three most used modes – Manual (M), Aperture priority (A or Av) and Shutter priority (S or Tv). If you are still shooting at Auto mode, you will need some time to switch to one of these modes. You will need to practice a lot, to experiment, and to learn how each of these settings affects your final image. After a while you will catch yourself looking the world around you differently, thinking which aperture and which shutter speed would be ideal for the scene you are looking at just now. Don’t worry, this is absolutely normal after you spend enough time with your camera 🙂
Manual, Aperture priority and Shutter priority modes
Is my photo exposed correctly?
Before we start with the individual modes, let’s take a look through the viewfinder or on the LCD screen. You should see something like this:
This scale shows how exposed your image will be if you press the shutter button right now. In the picture above you can see that the arrow points to +1, which means that your photo will be slightly overexposed (too bright). If the arrow goes to the negative numbers, that means that the photo will be underexposed (too dark). When the arrow is exactly on 0, the photo is exposed perfectly. If the arrow went too much to the right, you can either lower your ISO to reduce the sensor’s sensitivity, or you can use faster shutter speed or narrower aperture, so that less light can come inside. On the other hand, if the arrow is in the left part of the scale, you should increase your sensor’s sensitivity (increase ISO) or let more light in (by using slower shutter speed or wider aperture). So the point is, whatever setting you choose, you should always try to have this marker in the middle if you want your photo to be exposed properly. Of course, photography is an art, and in art there are no rules. But my opinion is that you should first learn some “unofficial” rules, and after you learn them and learn how to create photos which adhere those rules, then you can start breaking them. But always be sure that you are breaking the rules on purpose, not because you don’t know how to use your camera.
What about ISO?
Shutter speed and aperture opening will determine how much light will physically get to your sensor. ISO sensitivity will determine how much your sensor will be sensitive to that light and how bright your photo will be for a given amount of light.
Your DSLR camera will offer you two possibilities – to have a fixed ISO, or to set it to automatic mode, with certain limits.
When you press the Menu button on your camera you will see five different categories. The second one is the Shooting menu, which contains the ISO sensitivity settings. Navigate to that item and press the OK button. You will see another screen, where you can set basic ISO sensitivity, and choose whether you want to have Auto ISO sensitivity control.
If you turn this option on, you will be able to choose maximum sensitivity, and the minimum shutter speed (so that you can be sure that the shutter speed won’t go below certain level if you plan to shoot handheld). If auto ISO sensitivity control is turned off, your camera will stay at the basic ISO level.
Now we can go on and explain the three shooting modes.
Shutter priority mode (S/Tv)
In this mode you will be able to set the shutter speed by turning the wheel on your camera. The aperture will be automatically set, depending on the amount of light, so that the exposure meter will be in the center of the scale. ISO sensitivity will be either fixed or set automatically (if you chose that option as described in the previous step). This mode is useful when you are shooting a scene where timing and exposure length is crucial.
On one side, you will set very quick shutter speed if you want to catch the peak of action and to “freeze” it in time. It could be a basketball player in the middle of dunking, or a kid playing with a friend, or your cat which is jumping to catch the string, or a bird in mid-flight, or the waterfall in which you want to see razor sharp water drops…
Quick shutter speed allows you to catch a bird in mid-flight
On the other side, you will need a slow shutter speed if you want to catch the flow of water and to give it that silky look, or light trails on a road in the night, or if you are shooting stars in the night sky, or if you want to create a sense of motion using the technique known as “panning” (more about that in one of the later posts)…
Slow shutter speed allows you to capture the water flow
If you are shooting handheld, your shutter speed should be not slower than 1/50s. In my personal experience this is the lower limit to create a photo without blurriness caused by hand shaking. Of course, this stands for shooting still objects and people who are posing for a photo. If you are shooting moving subjects (people walking or running, cars, animals, children…), you will want even faster shutter.
Aperture priority mode (A/Av)
This mode will allow you to determine a fixed aperture opening, while the shutter speed will be set automatically. ISO can again be either fixed or set to automatic. This mode is useful when you want to control the depth of field in your photos.
If you open your aperture as much as possible (i.e. if you set a small f-number), you will have a sharp focused subject with blurred background. This is useful for taking portraits, and for close-up shots, for example of flowers or small objects. The depth of field will be very shallow. The larger the aperture, the stronger the blurriness of the background your photo will have, and the smaller depth of field will be. To achieve this effect it is also important to be as close to your subject as possible.
Large aperture will give you more blurriness in the background
On the other hand, small aperture (large f-number) will give you a large depth of field, so more objects both in the foreground and in the background will be sharp. This is useful for landscapes, when you want to have as much of the scene in focus as possible.
Small aperture gives you a large depth of field
Manual mode (M)
This mode is giving you the full control over all the settings that your camera has to offer. In this mode you can do the fine tuning of all parameters and nothing will be overriden.
Manual mode can be useful for example when you are shooting stars. You want to open the aperture as much as you can, to let in as much light as possible. Your shutter speed will depend on the focal length of your lens according to the “500 rule” (more on that in next posts). To put it simple, you don’t want shutter speed to be too fast because there will not be enough light, but also not too slow because stars movement will be caught and the stars will turn from dots to trails. Your ISO sensitivity should be high enough to capture tiny stars, but not too high so you won’t have too much noise. If you are shooting in one of the semi-automatic modes, your camera might get confused and set different configuration, but can also determine that there is not enough light and won’t even fire. We will talk more about stars photography in the following posts. However, this is one of the situations when you want to have the full control of your camera.
The other situation is when you are shooting people indoors, where the lighting is not so good. You don’t want your ISO to be too high, to prevent excessive noise. Your shutter speed should be 1/60s or faster, to prevent blur. You might not want to open your aperture all the way because you want to have a bit larger DoF, so you will narrow it down a little. If you were shooting in A or S mode, your camera might make a different decision, and you don’t want that. So you will put your camera in the M mode and tell it which settings you want. Remember, you are the artist who creates a picture, not the piece of hardware in your hands.
Manual mode is also useful when you want to experiment with different exposures. Let’s say that you have set your ISO to 100 and you can’t go any lower. Your aperture is f/2.8 and you decided that is just the perfect DoF for the given situation. Your shutter speed is 1/125s and you take a shot. The exposure is jut perfect, but you want it to be a bit darker, because you want to create a mysterious mood in your photo. As we have already said, can’t decrease your ISO and also you don’t want to close the aperture because you will lose that blurry background. So you will increase the shutter speed to 1/250s, and if that is also not dark enough you will proceed to 1/500s and maybe even to 1/1000s. If you were in Aperture priority mode, your camera would determine the “ideal” shutter speed for you and you wouldn’t have any chance to improvise and to give your personal touch to that photo. In Manual mode you are able to do anything you like and to express your vision of the scene.
Conclusion
My mission here is to help you get to know your camera better and to understand how, when and why can you use different shooting modes and settings. In 90% of situations I tend to use either Aperture priority or the full Manual mode, and in other cases I use shutter priority. This is entirely up to your preferences and to what you are photographing. I am not trying to persuade you to always use the Manual mode, because I am aware that many photographers in many situations might achieve better results with one of semi-automatic modes, or even in full auto mode. Or at least there will be situations when Shutter priority or Aperture priority will give you great results, without you worrying about all the other settings. But it would be a shame that you own an expensive state-of-the-art DSLR, and not make the most out of its potentials.
If you want to master the Manual mode, you should be prepared for a lot of theoretical learning, trials and errors, experimenting… No matter how many texts you read and how many photographers you talk to, you will never really start learning if you don’t take your camera and get outside to take some photos. Only then will you see how your camera acts, how the different settings affect your photos and what you can do to make them better, or just different. And don’t be afraid to change the settings, you can’t break a camera by doing that :).
Another topic is coming soon. Until then, share this post if you like it and if you think that someone else could benefit from it. Also, leave a comment and tell me what you think.
In the previous post you read about the exposure triangle, which consists of the shutter speed, the aperture and the ISO. Now it is time to get to know your camera a little better and to see what are all those shooting modes it has to offer.
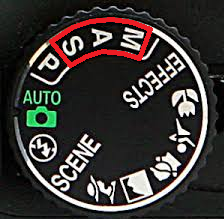
You have just bought your first DSLR camera, and now you’re looking at that round thing with a bunch of letters and symbols on top of it, right? It looks intimidating, but it really isn’t that complicated. Let’s go step by step and explain each and every of those options.
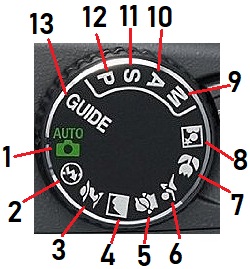
Let’s first take a closer look at it and mark all of those things so we could easily refer to them in the following text.
Different shooting modes on a DSLR camera
We will start from the number 1, the Auto or fully automatic mode. If you set your camera to this mode, you won’t have to worry about anything at all. The camera will evaluate the scene it “sees”, and it will adjust the shutter speed, the aperture, the ISO, and a lot of other settings we haven’t yet talked about. It will even pop up the built-in flash if it is too dark.
When is this mode good for you? In my opinion, the only situation it is useful is when you are an absolute beginner, and you are still unfamiliar with terms such as shutter speed, aperture, ISO… You don’t know anything about white balance, metering modes, focusing points, and other settings. You have no idea how to locate and change all of this stuff and how should you set them. In that case it is absolutely fine to let the camera do the “dirty work” for you and to guess the best settings for the given shot. That’s right, I said “to guess”, because the camera can never know what exactly did you want your photo to look like. It is going to set itself for the optimal exposure, and will disregard the fact that maybe you wanted to catch those light trails, or to have shallower depth of field for that portrait, or that you hate the built-in flash because it leaves those harsh highlights and ugly shadows on people’s faces.
Number 2 is the Automatic mode without flash. It works almost exactly in the same way as the previous one, but the difference is that the flash will never be activated. This mode is right for you if you recognize yourself in number 1 description, but you don’t like the flash. It will also automatically set all the other things your camera has to offer.
Number 3 is the semi-automatic Portrait mode. In this mode your camera will try to make the optimal settings for portrait shooting. That means it will set the large aperture opening (small f-number) so you could have the nice blurred background. You can further help it by zooming in or walking closer to your subject and moving your subject farther from the background objects.
Number 4 is the Landscape mode. Opposite to the previous one, this mode will close your aperture so you could have a large depth of field. The aperture might be too small, so a slower shutter speed might be needed. In this mode it would be good for you to have a tripod or some other solid object or surface to place your camera on.
Number 5 is the Kids mode. It will set somewhat increased saturation in the camera, so you could have rich colors in your photos. It will also increase the shutter speed because children are always on the move and you want to catch every single step they make.
Number 6 is the Sports mode. It is good for shooting sports (really), and generally fast moving objects, people or animals. In this mode your camera will have a high shutter speed, so you can freeze the action. With quick shutter comes the low amount of light and your camera could also set very high ISO, so be aware of that.
Number 7 is the Macro mode. Or maybe it would be better to call it a “close-up” mode. This is the setting that you want if you shoot flowers, insects, small objects… The aperture will be wide so the background will be blurred and the object will stand out. This mode also uses flash a lot. Of course, this will not turn your lens into a real macro lens and you won’t be able to focus closer than you normally can.
Number 8 is the Night portrait mode. This mode is good if you want to take a portrait which will be well-lit (and you need a flash for that), but you also want to catch the background and ambient lights. This mode will give you a little slower shutter speed (so that the ambient light could be caught), and the flash will fire when the second shutter curtain starts moving. That way you will have both the blurred background and a sharp main subject, lit by the flash.
Number 9 is the fully Manual mode and that is the real goal of this journey. Once you go through all the lessons I’m preparing, you will be confident and skilled enough to make the best out of this mode. This is where you set absolutely everything manually, you leave nothing to the camera to decide, and you take the full control of how your photo will look like.
Number 10 is the semi-automatic Aperture priority mode. On Nikon cameras it is marked as “A”, while on Canon cameras it is marked as “Av” (which stands for “aperture value”). In this mode you will set your aperture manually, and the camera will determine the shutter speed so you can have the optimal exposure. This is one of the modes where you can give your ISO a fixed value, or set it to ISO-Auto mode, with the given upper limit. This mode is great when you need a specific aperture, whether it is a very large one or a very small one (for example, for portraits or for landscapes), and you don’t really care about shutter speed and other settings. During my photographic journey, this was the mode I have used the most. Nowadays I’m slowly switching to fully manual and I like it 🙂
Number 11 is the Shutter priority mode, marked as “S” on Nikon cameras and as “Tv” (time value) on Canon cameras. Contrary to the “A” mode, in “S” mode you will set a shutter speed value, and the aperture will be set automatically. ISO can also be set either manually or automatically with the upper limit. The logic for this mode is similar to the aperture priority logic – you will use it either when you want very quick or very slow shutter (for example, for shooting sports, or shooting light trails), and you don’t care about the other settings.
Number 12 is the Program mode, marked as “P”. This mode initially acts as a fully automatic mode. Your camera will determine the best settings for the optimal exposure. You can just go with it and take the shot, or you can change something. For example, you are taking some nature photos and your Program mode decided that the narrow aperture will be the best choice. But at some point you want to take a closeup photo of a flower and you increase the aperture so you can have a nice blurred background. Your camera will accept your input and the aperture will keep the value that you set, but other settings, such as shutter speed and ISO will be modified in order to keep a proper exposure. So basically, your Program mode will initially say: “Here, I think this is the best setting for the scene that I see”, and you can say: “That’s fine, but let’s change this one little thing and you adjust the other ones if needed”.
Number 13 is the Guide mode. This is kind of a step by step manual which will lead you through the possibilities that your camera can offer. If you select this mode on a dial, you will see a first choice on the screen – Shoot, View/Delete or Set up. If you choose “Shoot” (because you want to take some photos, right?), the camera will lead you through next steps. Do you want an easy or an advanced operation? The easy mode will ask you what kind of scene do you want to photograph – moving subjects, landscapes, portraits, sunsets… The advanced one will give you more possibilities – soften backgrounds, bring more into focus, freeze motion, show water flowing, capture reds in sunsets and so on. You just have to pick the type of the scene you are shooting and the camera will take care about the settings.
In the next post we will go through the most frequently used modes – aperture priority, shutter priority and manual mode, and we will display and explain several photos which were taken using those modes.
Until then – stay tuned, and don’t forget to share this post and to leave your thoughts in the comment section. See ya 🙂
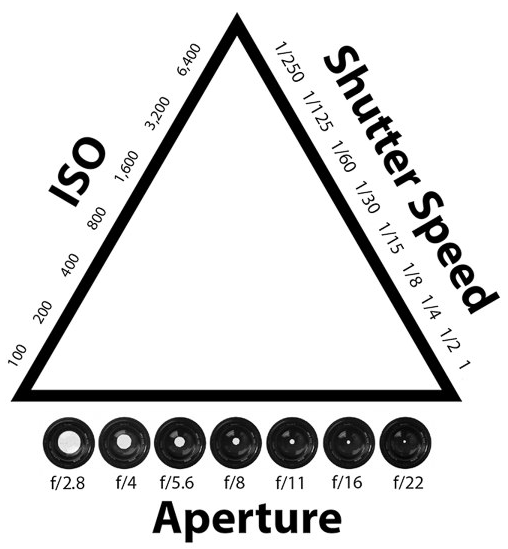
As you could read in the previous text, there are some important camera and lens characteristics that affect how your images will look like. The three most important are shutter speed, aperture and ISO.
These three factors make the so-called “Exposure Triangle”:
The exposure triangle
We will go through all three components in detail so that you can understand each of them.
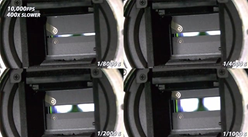
Shutter speed
This “speed” is actually the time, or the duration of the exposure. It shows how long the shutter curtains will remain open and expose the sensor. When a photographer presses the shutter button, the first curtain will start moving down and exposing the sensor. The second curtain will start moving down after the first one. The second curtain will start moving sooner or later, depending on the shutter speed chosen.
Shutter curtains at different shutter speeds
The shutter speed is expressed in seconds, or fractions of seconds. It can be as quick as 1/8000s. On the other end, you can set the exposure to several tens of seconds. You can also choose the “Bulb” mode in which you can open the curtains by pressing the remote shutter release button, and they will remain open until you press the button again, thus allowing you to keep the sensor exposed for several minutes or even longer.
When the shutter speed is very fast, you will be able to “freeze” the motion. You could use fast shutter speeds when photographing sports, children playing, birds flying, and so on. Your sensor will receive less light if you use quick shutter, so the image will be darker.
When the shutter speed is slow (i.e. when you make a long exposure), you will have the motion in your photos. It is useful when you want to catch the light trails of moving cars, or to create the “silky” look of flowing water. The sensor will receive a lot of light with longer exposures, so the image will be brighter.
Quick shutter speed “freezes” the motionSlow shutter speed captures the motion over some time
Aperture
Aperture is the opening in the lens. The aperture diameter is expressed as a fraction of the current focal length, for example f/1.4, f/1.8, f/2, f/5.6, f/11 and so on. For example, if you have a 50mm lens and set its aperture to f/2, that means that the width of the lens “hole” will be 25mm.
Changing your aperture width has two effects. The first one, and the most obvious one – if you increase the f-number (i.e. if you decrease the lens opening diameter), you will decrease the amount of light which enters into your camera. If you decrease the f-number (increase the lens opening), the amount of light will be increased. Having in mind that the lens opening is approximately a circle, we can assume that it has an area of π*(D/2)² (D is the diameter). If we increase D by √2, we will increase the area 2 times. That is known as the “f-stop”. For example, if your aperture is set to f/2.8, and you want to double the amount of light, the next “stop” will be f/2. Of course, we assume that all other settings on your camera will remain unchanged while you are changing the aperture.
The other effect that the aperture has on your photo is the so called “depth of field” (DoF). To put it simply, that is the area which will be in focus. The lower the f-number, the smaller the depth of field will be and vice versa. In other words, if you set the aperture to f/1.8, you will get a photo which has only one shallow area focused, while everything behind and in front of it will be blurred. If you increase the f-number to let’s say f/11, you will have much more of the image in focus, and the blurriness of other parts will be much less intense.
You will use large aperture (small f-number) for example when making portraits, because you want your subject to pop out, and the background to be blurred so it wouldn’t distract the viewer. The opposite case would be landscape photography, where you want to have as much depth as possible in focus, so you will need small aperture (large f-number).
Large aperture (small f-number) gives a shallow DoF and blurry backgroundSmall aperture (large f-number) gives a large DoF and the large part of the photo in focus
ISO
ISO is a measure of a sensor sensitivity, i.e. how much light does it need to create a properly exposed image. ISO is usually expressed in hundreds, e.g. 100, 200, 400, 800, 1600, 3200… On modern cameras ISO can go as low as 50, or as high as several hundreds of thousands. Same as the shutter speed and the aperture, the ISO change also has two effects on the photo.
The first effect is the brightness of the image. When you double the ISO (without changing any other settings), for example from 400 to 800, the image will be twice as bright. On the contrary, when you lower the ISO e.g. from 200 to 100, the image will be two times darker.
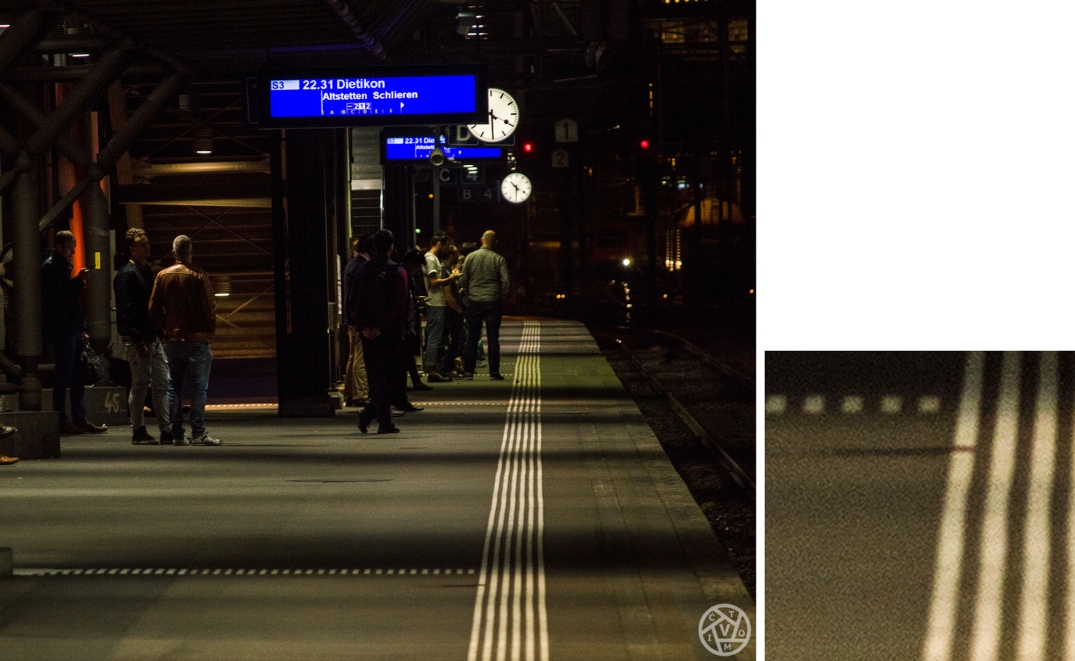
The second effect is the quality, or better said, the amount of noise in the image. When the ISO goes up, so does the digital noise, and your photo loses its quality.
When zoomed in, there is visible grain in this photo with high ISO
Balancing the triangle
Having said all of this, it is clear that a photographer has to balance between these three factors in order to create a photo which is properly exposed, with as less noise as possible, and without any unwanted blurriness. If you have a quick shutter speed and a narrow aperture, you will need high ISO. If you have low ISO and quick shutter speed, you will need a large aperture. If you have a narrow aperture and a low ISO you will need a slow shutter speed. Or to put it a bit differently, if you want a high ISO and a wide aperture, you will need a quick shutter speed, and so on…
Let’s go through some examples…
Example 1: You are photographing a bird in flight on a sunny day. You want to freeze the motion. You have to use quick shutter speed, but you can open your aperture to let more light in (and also to have only the bird in the focus, without the background), so you can leave ISO on a low level.
Example 2: You are photographing the same bird, but on a cloudy day, or in the dusk. Even though you have opened the aperture, there is still not enough light. You will need to raise the ISO so you will get the well-exposed photo, and you will have to learn to live with somewhat higher noise.
Example 3: You are photographing a beautiful landscape on a sunny day. You set a high f-number so that you can have as much of the photo as possible in focus. You also want to have low ISO in order to have a high quality image. Therefore, you might need somewhat slower shutter speed so that enough light can get to the sensor.
Example 4: You are standing on the overpass above a highway in the night and you want to capture the cars’ light trails. You will need a slow shutter speed (maybe 20-30 seconds), and a low ISO so you won’t have much noise. Your aperture can be somewhere around the half, which will give you the best image sharpness.
Example 5: You are making a portrait of your kid inside your house. You need a large aperture opening to make your kid stand out, and somewhat faster shutter because kids cannot stand still. Since you are indoors and there is not enough light (and you have also set quick shutter speed), you will set higher ISO to compensate for it.
Hopefully you have a good overview of these three main factors and now you know how each of them affects the photo you’re making. In the next post we will talk about different camera settings which will let you control these factors in different ways. After all, your goal is to stop using the automatic mode on your camera, because it is destroying your creativity and freedom.
See you soon, and don’t forget to share this post and to leave a comment, I’d love to hear from you 🙂
In this post we will talk about the basic principles of a DSLR camera’s mechanism. After reading this post you will have necessary knowledge to understand the lessons that will follow shortly.
What is a DSLR camera anyway? The abbreviation stands for “Digital Single Lens Reflex” camera. So that is a digital camera which uses a single lens, and has a mirror which is reflecting the light that enters the camera body through the lens. Let’s get into more details.
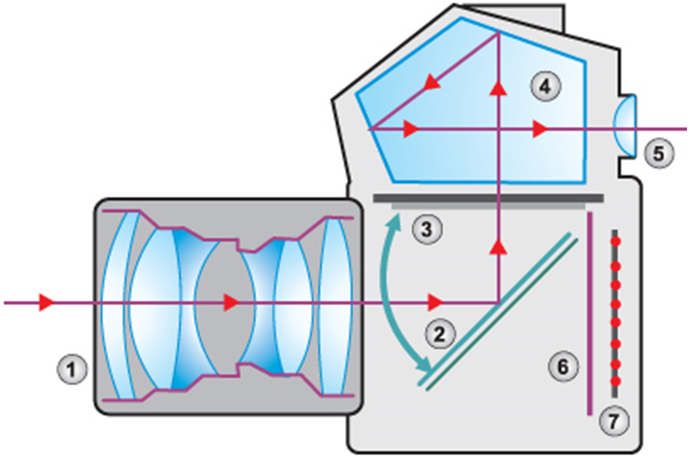
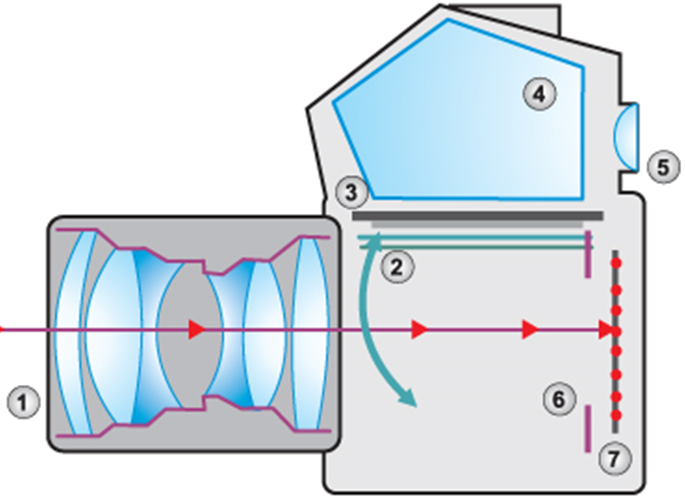
A camera body contains several important parts, and we will explain them as we follow the path of the light that enters the camera body through the lens opening:
When the light passes the lens (1), it hits the mirror(2) and reflects upward. It’s passing the matte focusing screen (3) and enters the pentaprism (4). In the pentaprism the light reflects two times and then exits through the viewfinder, allowing the photographer to see the scene and create the composition.
When the photographer presses the shutter release button, several things happen:
A mirror (2) rises and allows the light to pass through. The light is not reflected up anymore and this is the reason why you see a short “blackout” in the viewfinder when you press the button. The light continues further toward the shutter curtains (6). The first (lower) curtain starts moving down, thus allowing the light to reach the sensor (7). The upper curtain follows down and stops the light. Finally, all the elements (the mirror and the curtains) go back to their initial position.
There are some important terms that you should remember in order to follow the following posts.
Focal length is the distance between the lens’ focal point and the sensor. It is expressed in milimeters. There are prime and zoom lenses. The prime lenses have fixed focal length, e.g. 35mm, 50mm, 85mm, 105mm… The zoom lenses have different ranges of focal lengths, e.g. 18-55mm, 18-105mm, 24-70mm, 70-200mm, and so on.
Aperture is the measure of the lens opening. It is expressed as a fraction f/X, where “f” is the focal length and X is its divisor, for example f/1.8, f/2, f/3.6, f/11… Of course, the smaller the number, the wider the lens opening and vice versa. There are zoom lenses with fixed maximum aperture. For example, 70-200mm f/4 has a constant f/4 aperture throughout the whole zoom range. On the other hand, some lenses have variable maximum aperture. For example, 18-55mm f/3.5-5.6 has an f/3.5 aperture on its “wide” end (18mm), and when zooming in it decreases gradually to f/5.6 at its “tele” end (55mm).
Shutter speed is a little bit misleding term. It is actually the duration of how long the shutter curtains remain open i.e. how long will the sensor be exposed to the light. It is expressed in seconds, or fractions of second, e.g. 1/1000s, 1/200s, 1/5s, 1s, 2s, 20s…
ISO is the measure of the sensor’s sensitivity, e.g. ISO 100, 200, 400, 800, 1600, 3200… Lower number means that the sensor will have lower sensitivity, the image will be darker, but with less noise.
Focal length and aperture are the characteristics of a lens. Shutter speed and ISO are the characteristics of a camera. We will go over them one more time in the next lessons and we will also introduce some new terms, but this should be enough for the beginning.
See you soon with new posts. Until then, feel free to leave a comment and to share this post. Thank you for reading 🙂