
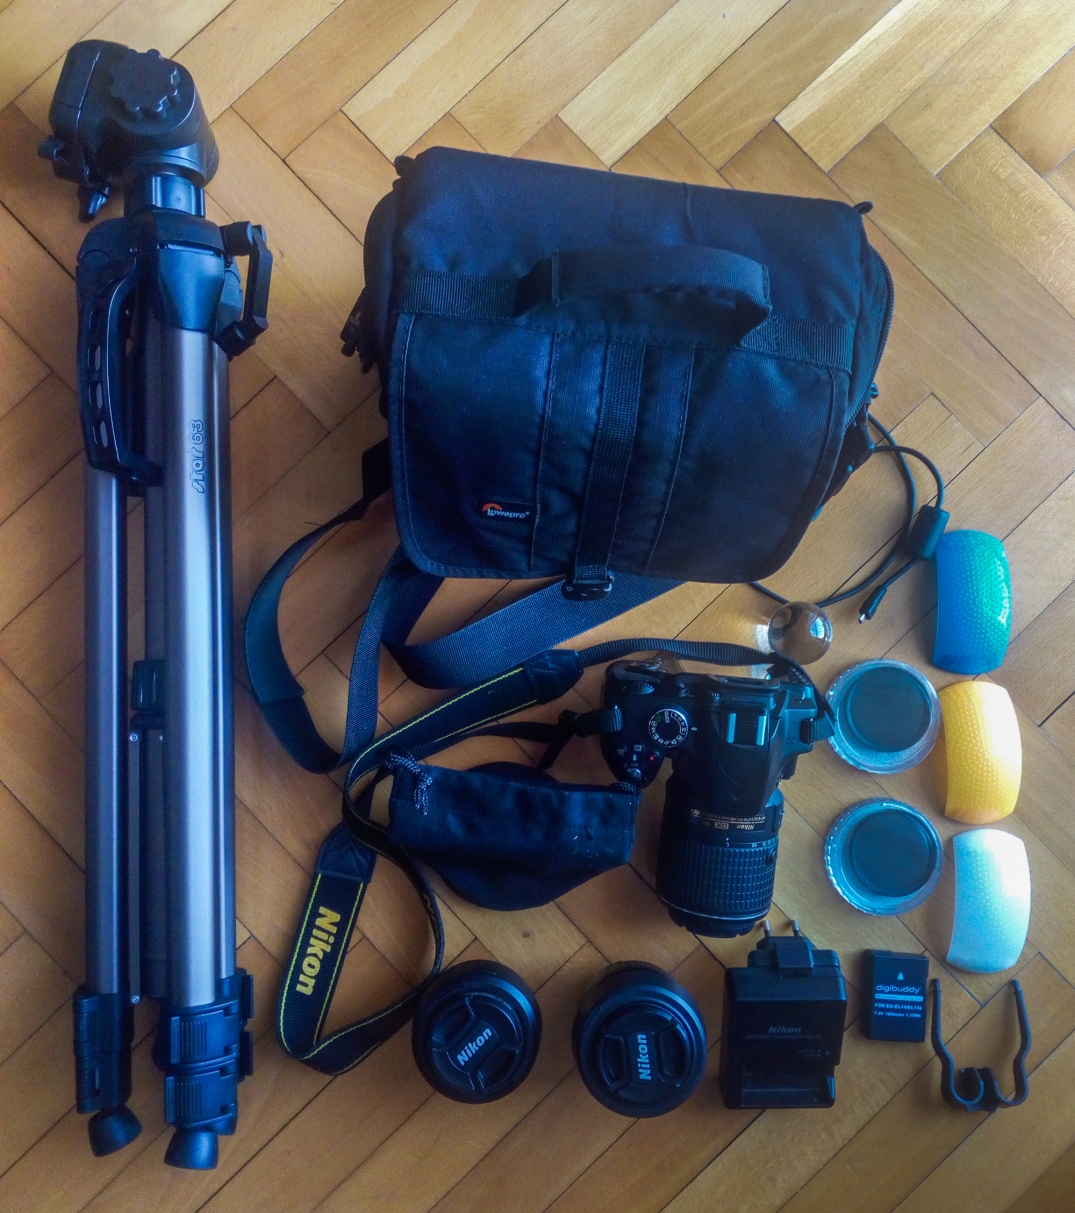
Today I will give you an insight into the gear that I use. I will talk a bit about each part of the equipment – why and how do I use it, and what would be the better alternative in my opinion.
Camera: Nikon D3200
When I decided to buy my first DSLR (end of 2015), the first criteria was to keep the expenses as low as possible. The second criteria was to buy either Nikon or Canon. All other manufacturers were too unknown to me (at least when it comes to the DSLR world) and I didn’t feel comfortable buying any other brand. For several weeks I was researching, looking at the specifications, comparing prices, megapixels, ISO ranges, shots-per-second in burst mode, I was reading blogs and forum posts, different reviews, I was watching Youtube videos about different models… and I made my final decision and bought D3200.
What is this camera good for?
This is a great little camera, not only for a beginner, but even for intermediate photographers. It also had a great value for money (I’m writing in past tense because I think you can’t buy a new one anymore). It is relatively small and can fit almost anywhere. The dynamic range is great and if you shoot RAW you can really get stunning results both in highlights and in shadows. And it has a 24 MP sensor, so you can really get a high quality image even after cropping the hell out of it.
What would I do differently today?
Actually, nothing. If I went back through time to 2015, I would buy the same camera again. It has everything it needs to have (at least for a beginner), it is affordable, it has a great dynamic range… One downside of this camera is pretty high noise level at ISOs over 800, but I can live with that. If I shoot in low-light conditions, it’s either a long exposure, or I try to use a fast prime lens, so I don’t really have to go over ISO 800.
Kit lens: Nikon AF-S DX NIKKOR 18-55mm f/3.5-5.6G VR
After I chose the camera model, I found two options regarding the kit lens. I could choose between 18-55mm and 18-105mm. The latter was around 100 EUR more expensive, and that was the only reason why I opted for the 18-55.
What is this lens good for?
For a beginner who still has to learn about photography, this is a good all-purpose lens with pretty good value for money. I still use it, especially at 18mm, when I need a really wide angle.
What would I do differently today?
I would definitely go for 18-105. Now I realize that I had absolutely no clue about lenses and focal lenghts. I remember that I was slightly disappointed when I first turned my new camera on, “zoomed” all the way to 55mm and realized that there is almost no zoom at all (compared to what I see with my naked eye). If I bought the 18-105 it would make my life much easier in the situations when I needed to get really close to a subject, or when I wanted to change the perspective and to have more space compression.
Telephoto lens: NIKKOR 55-200mm
This was my second big purchase. After a while I overgrown the 18-55 and I really needed something longer. I like to photograph animals, airplanes, I like candid street photography… and I could barely do any of those with 55 milimeters. So I decided to buy a telephoto and I opted again for the cheap lens, because photography is not my profession, just a hobby, and there were other priorities in my life which needed mucho dinero.
What is this lens good for?
As I mentioned, you need a long lens if you want to take photos of a subject which you can’t approach physically (or you can but you don’t feel comfortable). Candid photography is much easier, as well as shooting animals in the nature. My other passion is airplane photography and I can’t really get inside the security perimeter so I need to take photos from a certain distance. Portraits and full-body shots also turn out pretty nice with this lens, because I’m able to isolate my subject and to have almost none of the distracting surroundings. And last but not least, recently I started shooting landscapes with this lens. I take several vertical shots which overlap by 20-30% and then I stitch them together. That way I get a nice panoramic shot with a large resolution.
What would I do differently today?
Having in mind that my photography budget is limited, I think I won’t be able to find anything much better for the same amount. I was thinking about Sigma or Tamron (with same or similar focal length range), but I’ve found many bad reviews online and therefore I opted for Nikon. It would always be better to have a faster lens, but that would also require much more money.
Prime lens: NIKKOR 35mm f/1.8G
This is my last purchase which I made because I felt a need to get a fast prime lens. I was thinking and deciding for more than one month. The two candidates were 50mm f/1.8g and 35mm f/1.8g. I knew that the 50mm lens would be better for portraits, but that was pretty much it. The 35mm would be generally better for multiple purposes. Landscapes, portraits, full body shots, street photography… So that’s why I decided to buy that one.
What is this lens good for?
As I’ve mentioned, this is a great all-purpose lens. Since I bought it, there was only one occassion in which I used my old 18-55. I feel that I can do almost anything with the 35mm. It’s forcing me to move around, to “zoom with my legs”, to explore different possibilities and compositions and finally I end up with much more involvement in my photos and of course the image quality is much better than with my zoom lenses. It also has a large aperture, so it’s great for low-light situations, as well as for astrophotography (although it might be a little too long for that purpose).
What would I do differently today?
Absolutely nothing! This is the best lens I’ve purchased so far and the most used one.
UV filter: Hama
This was the first thing that I purchased shortly after buying my camera. I don’t really care so much about the UV light, but it’s important for me to have some kind of physical protection for the lens. It’s much better to scratch or even break the 20 EUR filter than a 200 EUR lens. Good thing is that all my lenses have the same diameter (52mm), so I don’t have to buy various filters or adapters, I can just move the same filter from one lens to another.
The bad side of this filter is that sometimes it can produce flares in my images. Even the hood won’t help. In these cases I just have to take it off. It is a cheap filter after all and I’m sure that there are more expensive filters with higher quality, but currently it’s not a priority for me to have one of those.
ND filters: Visico, ND4 and ND8
I’ve got these filters from a colleague of mine, as a New Year’s gift.
What do these numbers mean? They are basically 2 to the power of f-stop reduction. For example, if you are not using any ND filter, your camera will receive 100% of the available light in a particular time period. If you use an ND2 filter, it will reduce the amount of light by 1 f-stop, which means that it will let 50% less light in the camera during the same period of time compared to not using any filter. An ND4 filter has 2 f-stops of reduction, which means it will let 25% of the light. An ND8 filter has 3 f-stops of reduction and will let 12.5% of the light and so on…
The good thing is that you can combine those filters by stacking them on top of each other. So if I would use both of my filter that would decrease the light amount by 2 + 3 = 5 stops, which would be equal to ND32 filter. What that means is that for the same aperture and ISO values I can have 5 times longer shutter speed, which is extremely useful for the long exposure photography during the daylight.
Tripod: Hama Star 63
A tripod is one of those must-have things for all kinds of long-exposure photography, or for those situations when you want to do some kind of focus stacking, or if you want to stand in front of the camera yourself…
As for all the other parts of my equipment, I also didn’t want to spend much on the tripod. I bought a cheap Hama tripod, which is not the most stable one, not the most flexible one, not the most compact one… well, it’s probably not the best one in any category, but it gets the job done.
With this tripod I miss two things the most. First – I can’t rotate my camera left and right, and that would be very useful for creating panorama photos. And the second thing – it’s too big and it’s not really suitable for travelling, there’s no way to pack it into my bag when I’m flying.
Of course, in some situations you can go without the tripod, and you can use any other solid surface to place your camera on (a rock, a sidewalk, your backpack, a fence…), but in most of the cases it is much easier to put a camera on a tripod and to adjust the angle and the height as you need it.
Remote shutter release
A remote shutter release is used to trigger your shutter without touching the button (or your camera at all). You can find those remotes either with or without a cord. A cordless trigger is cheaper, but less reliable.
Why would you need a remote trigger? Well, it can have several purposes.
First, when you make a long-exposure photo, it can reduce the chance of blur caused by camera vibrations which could happen when you press the button. Hint: if you don’t have a remote shutter, try setting a timer to 2 seconds so the camera has enough time to “calm down” after you press the button.
The second usage would be to create an exposure longer than 30 seconds. The longest shutter speed that my Nikon can achieve is 30 seconds, and the next step is “Bulb” mode. In this mode you should keep the shutter button pressed for as long as you want your exposure to last. Since it could be very tiring and boring and could cause your camera to shake, much better solution is to use a remote trigger. When you set your shutter speed to “Bulb”, the first press on the remote shutter button will open the shutter curtains and expose your sensor. It will stay open untill you press the remote shutter button again.
The third possible usage would be to take some selfies, when you stand in front of the camera and then just press remote shutter. You could also set the timer on your camera, but then you have to press the button on the camera and to run back to your position, which can be not so easy to perform. You also have the option to set the remote shutter release with a delay, so you have a couple of seconds between pressing the remote shutter and the actual shot (which you can use to hide the remote trigger somewhere).
Bag: Lowepro
I bought this bag together with my camera and for the beginning it was just big enough.
Nowadays I have two more lenses to fit in and some additional equipment (ND filters, a charger, a spare battery…). For the last couple of trips I opted to leave my 18-55mm lens at home because there was no safe way to fit it into the bag. A few weeks ago I also went out of my city for a weekend and instead of this bag I decided to use my company’s backpack for the laptop.
This bag is also not so convenient when you have to climb, to jump over or crouch and pass under obstacles, it keeps swinging left and right… For me, a backpack would be much better solution.
Glass ball
I bought this ball via eBay for only $2. It inverts the scene in front of you and you can create some really cool images with it. Money well spent, if you ask me.
Gels for the built-in flash
One of the rare things which I bought online and which I don’t use at all. Actually, I don’t use built-in flash at all, that’s a big NO for me. This flash gives harsh lights and shadows, and everything in the image looks awful.
These gels are colored pieces of plastic which are attached in front of the flash. I have one white, one blue and one orange piece. All of them will diffuse the light and the effects of the flash won’t be so terrible. In addition to that, the blue piece will make the whole image much cooler while the orange one will make it much warmer. However, I tried them once and the results were very bad. It was like someone took a bucket of blue (or orange) paint and threw it all over my living room. These gels are my only purchase that I really regretted.
What else do I need?
Until a few months ago I had a serious case of G.A.S. (Gear Acquisition Syndrome). I was thinking only about new parts of equipment, new lenses, new filters, I was reading the reviews, watching the videos, thinking how this lens or that filter would improve my photos…
When I bought my 35mm lens, I felt a relief. I think that was the point when I stopped thinking about new equipment and instead started to learn about different photography techniques which will really improve the quality of my work.
Yes, it’s true that the same image will look much better if you take it with Nikon D5 instead of D3200, especially if you mount a 24-70mm f/2.8G ED lens on it instead of 18-55 kit lens (or a 70-200 instead of 55-200). I would also find some smaller things very useful, like a tripod with better head (which can move in all directions), or a larger bag, or maybe a circular polarizing filter. But also I could easily think of some more expensive stuff which I really need for certain types of photography. I could use a fast wide lens for astrophotography (maybe a Nikon 14-24mm f/2.8G ED), or a really long telephoto for some wildlife photography (maybe a Nikon 800mm f/5.6E FL ED VR), or a full-frame camera (it doesn’t need to be the aforementioned D5, it could be “only” a D850). For some occassions I could also need an external flash (like a Nikon SB-900), or even a couple of them.
But hey, currently I drive a car which could be sold for up to 1500 EUR and I have absolutely no intention to spend 5000 EUR for a camera, or 2000 EUR for a lens :). Photography is a great hobby, but a very expensive one, and it’s very easy to fall into this whirlpool of spending money. You will always feel that you need more stuff and better things, even if you’re just a hobbyist photographer who takes a couple of photos only on weekends.
What equipment do you need?
I started doing photography with my mobile phone camera. I was doing it for a year or so and then decided to buy a point-and-shoot camera. It was a Nikon (of course :)) and I bought it online, it was a used one. Now I had some extra options, like the ability to set the ISO or the shutter speed, but I still had no clue what are those settings for. So basically the only thing that really improved was the number of megapixels and the overall image quality.
After a year or so I really felt the need to buy something “serious”. In the meantime I learned a few things about the photography, I knew what is the shutter speed, what’s the aperture, what is the long exposure and so on… I wanted a piece of equipment which will allow me to really visualize my new knowledge. That was when I bought my low-cost Nikon and embarked this journey.
And I’m glad I did it this way. If I bought a DSLR 6 years ago, when I had absolutely no clue what it could be good for, I would probably end up having my mode dial stuck on the fully automatic mode, shooting JPEGs, using the built-in flash and having my horizon tilted all the time. If I wanted that, I could as well stay with the phone camera and save myself tons of money.
If you plan to buy a camera and to start doing photography for fun, here is my advice. Spend a few months taking photos with your phone. See if you really enjoy it. Ask other people for a feedback. Try to improve. Get up at 04:30 AM and go take some photos of a sunrise. In the winter spend a few hours near the river, in the freezing wind, just to take some photos of the morning mist. Stay out until 2 AM to take a photo of that rising full moon. Leave from home a couple of hours earlier and spend that time walking around and photographing your city in the morning before you go to work. Get to the airport 4 hours before your flight just so you’ll be able to take some photos of the airplanes taking off and landing. Lay in the snow so you could take a photo of that frozen flower from the ground level. Slow down. Watch the world around you. Try to imagine how would that scene look through the camera. Take the photo. Ask for a feedback again. Try to improve further.
Do you still enjoy it? Do you still take photos each day? You are not getting bored or tired? You still feel that each day and each street in your city brings something new and interesting? Well, congratulations, you have qualified! 🙂 But if you had at least one moment when you thought: “Damn, this is boring… I hate this… I’m cold… I want to go home… I don’t like this”… well… sorry to disappoint you, but I think you shouldn’t invest any money in the photo equipment. If it’s boring with the phone camera it will also get boring with the top-notch DSLR and after a while you will be taking your camera out of the bag only for your children’s birthdays.
If you decide to buy your first pieces of equipment, don’t spend much money on the camera, but instead spend it on a good lens (or a couple of them). That’s what will make your photos much better (or worse). Invest in a couple of zoom lenses, so you can cover a large range of focal lenghts. If you later decide to do only a single type of photography, adjust your equipment accordingly – sell something not needed, buy something new, and tune your gear for the specific purpose. If you start earning money from your photography, invest more, buy better stuff. Go for it! 🙂
I hope you enjoyed reading this at least a little. I enjoyed writing, that’s for sure 🙂
See ya soon,
V.
