
In the previous post you read about the exposure triangle, which consists of the shutter speed, the aperture and the ISO. Now it is time to get to know your camera a little better and to see what are all those shooting modes it has to offer.
You have just bought your first DSLR camera, and now you’re looking at that round thing with a bunch of letters and symbols on top of it, right? It looks intimidating, but it really isn’t that complicated. Let’s go step by step and explain each and every of those options.
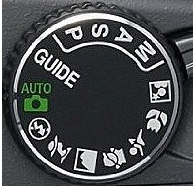
Let’s first take a closer look at it and mark all of those things so we could easily refer to them in the following text.
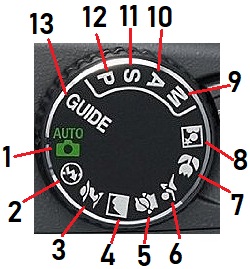
We will start from the number 1, the Auto or fully automatic mode. If you set your camera to this mode, you won’t have to worry about anything at all. The camera will evaluate the scene it “sees”, and it will adjust the shutter speed, the aperture, the ISO, and a lot of other settings we haven’t yet talked about. It will even pop up the built-in flash if it is too dark.
When is this mode good for you? In my opinion, the only situation it is useful is when you are an absolute beginner, and you are still unfamiliar with terms such as shutter speed, aperture, ISO… You don’t know anything about white balance, metering modes, focusing points, and other settings. You have no idea how to locate and change all of this stuff and how should you set them. In that case it is absolutely fine to let the camera do the “dirty work” for you and to guess the best settings for the given shot. That’s right, I said “to guess”, because the camera can never know what exactly did you want your photo to look like. It is going to set itself for the optimal exposure, and will disregard the fact that maybe you wanted to catch those light trails, or to have shallower depth of field for that portrait, or that you hate the built-in flash because it leaves those harsh highlights and ugly shadows on people’s faces.
Number 2 is the Automatic mode without flash. It works almost exactly in the same way as the previous one, but the difference is that the flash will never be activated. This mode is right for you if you recognize yourself in number 1 description, but you don’t like the flash. It will also automatically set all the other things your camera has to offer.
Number 3 is the semi-automatic Portrait mode. In this mode your camera will try to make the optimal settings for portrait shooting. That means it will set the large aperture opening (small f-number) so you could have the nice blurred background. You can further help it by zooming in or walking closer to your subject and moving your subject farther from the background objects.
Number 4 is the Landscape mode. Opposite to the previous one, this mode will close your aperture so you could have a large depth of field. The aperture might be too small, so a slower shutter speed might be needed. In this mode it would be good for you to have a tripod or some other solid object or surface to place your camera on.
Number 5 is the Kids mode. It will set somewhat increased saturation in the camera, so you could have rich colors in your photos. It will also increase the shutter speed because children are always on the move and you want to catch every single step they make.
Number 6 is the Sports mode. It is good for shooting sports (really), and generally fast moving objects, people or animals. In this mode your camera will have a high shutter speed, so you can freeze the action. With quick shutter comes the low amount of light and your camera could also set very high ISO, so be aware of that.
Number 7 is the Macro mode. Or maybe it would be better to call it a “close-up” mode. This is the setting that you want if you shoot flowers, insects, small objects… The aperture will be wide so the background will be blurred and the object will stand out. This mode also uses flash a lot. Of course, this will not turn your lens into a real macro lens and you won’t be able to focus closer than you normally can.
Number 8 is the Night portrait mode. This mode is good if you want to take a portrait which will be well-lit (and you need a flash for that), but you also want to catch the background and ambient lights. This mode will give you a little slower shutter speed (so that the ambient light could be caught), and the flash will fire when the second shutter curtain starts moving. That way you will have both the blurred background and a sharp main subject, lit by the flash.
Number 9 is the fully Manual mode and that is the real goal of this journey. Once you go through all the lessons I’m preparing, you will be confident and skilled enough to make the best out of this mode. This is where you set absolutely everything manually, you leave nothing to the camera to decide, and you take the full control of how your photo will look like.
Number 10 is the semi-automatic Aperture priority mode. On Nikon cameras it is marked as “A”, while on Canon cameras it is marked as “Av” (which stands for “aperture value”). In this mode you will set your aperture manually, and the camera will determine the shutter speed so you can have the optimal exposure. This is one of the modes where you can give your ISO a fixed value, or set it to ISO-Auto mode, with the given upper limit. This mode is great when you need a specific aperture, whether it is a very large one or a very small one (for example, for portraits or for landscapes), and you don’t really care about shutter speed and other settings. During my photographic journey, this was the mode I have used the most. Nowadays I’m slowly switching to fully manual and I like it 🙂
Number 11 is the Shutter priority mode, marked as “S” on Nikon cameras and as “Tv” (time value) on Canon cameras. Contrary to the “A” mode, in “S” mode you will set a shutter speed value, and the aperture will be set automatically. ISO can also be set either manually or automatically with the upper limit. The logic for this mode is similar to the aperture priority logic – you will use it either when you want very quick or very slow shutter (for example, for shooting sports, or shooting light trails), and you don’t care about the other settings.
Number 12 is the Program mode, marked as “P”. This mode initially acts as a fully automatic mode. Your camera will determine the best settings for the optimal exposure. You can just go with it and take the shot, or you can change something. For example, you are taking some nature photos and your Program mode decided that the narrow aperture will be the best choice. But at some point you want to take a closeup photo of a flower and you increase the aperture so you can have a nice blurred background. Your camera will accept your input and the aperture will keep the value that you set, but other settings, such as shutter speed and ISO will be modified in order to keep a proper exposure. So basically, your Program mode will initially say: “Here, I think this is the best setting for the scene that I see”, and you can say: “That’s fine, but let’s change this one little thing and you adjust the other ones if needed”.
Number 13 is the Guide mode. This is kind of a step by step manual which will lead you through the possibilities that your camera can offer. If you select this mode on a dial, you will see a first choice on the screen – Shoot, View/Delete or Set up. If you choose “Shoot” (because you want to take some photos, right?), the camera will lead you through next steps. Do you want an easy or an advanced operation? The easy mode will ask you what kind of scene do you want to photograph – moving subjects, landscapes, portraits, sunsets… The advanced one will give you more possibilities – soften backgrounds, bring more into focus, freeze motion, show water flowing, capture reds in sunsets and so on. You just have to pick the type of the scene you are shooting and the camera will take care about the settings.
In the next post we will go through the most frequently used modes – aperture priority, shutter priority and manual mode, and we will display and explain several photos which were taken using those modes.
Until then – stay tuned, and don’t forget to share this post and to leave your thoughts in the comment section. See ya 🙂

Pingback: Shutter priority, Aperture priority, Manual mode… – Vladimir Tomić Photography