

As you could read in the previous text, there are some important camera and lens characteristics that affect how your images will look like. The three most important are shutter speed, aperture and ISO.
These three factors make the so-called “Exposure Triangle”:
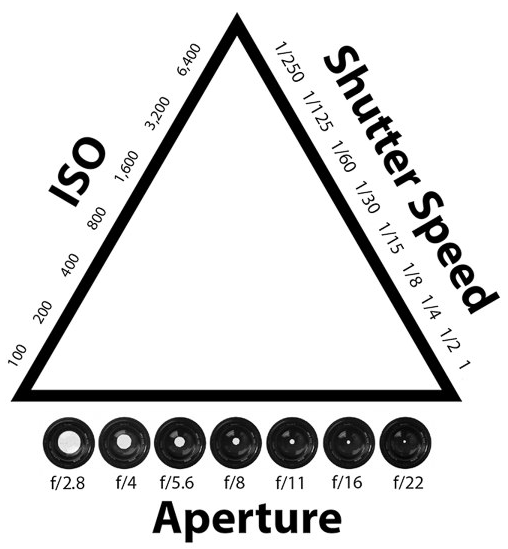
We will go through all three components in detail so that you can understand each of them.
Shutter speed
This “speed” is actually the time, or the duration of the exposure. It shows how long the shutter curtains will remain open and expose the sensor. When a photographer presses the shutter button, the first curtain will start moving down and exposing the sensor. The second curtain will start moving down after the first one. The second curtain will start moving sooner or later, depending on the shutter speed chosen.
The shutter speed is expressed in seconds, or fractions of seconds. It can be as quick as 1/8000s. On the other end, you can set the exposure to several tens of seconds. You can also choose the “Bulb” mode in which you can open the curtains by pressing the remote shutter release button, and they will remain open until you press the button again, thus allowing you to keep the sensor exposed for several minutes or even longer.
When the shutter speed is very fast, you will be able to “freeze” the motion. You could use fast shutter speeds when photographing sports, children playing, birds flying, and so on. Your sensor will receive less light if you use quick shutter, so the image will be darker.
When the shutter speed is slow (i.e. when you make a long exposure), you will have the motion in your photos. It is useful when you want to catch the light trails of moving cars, or to create the “silky” look of flowing water. The sensor will receive a lot of light with longer exposures, so the image will be brighter.


Aperture
Aperture is the opening in the lens. The aperture diameter is expressed as a fraction of the current focal length, for example f/1.4, f/1.8, f/2, f/5.6, f/11 and so on. For example, if you have a 50mm lens and set its aperture to f/2, that means that the width of the lens “hole” will be 25mm.
Changing your aperture width has two effects. The first one, and the most obvious one – if you increase the f-number (i.e. if you decrease the lens opening diameter), you will decrease the amount of light which enters into your camera. If you decrease the f-number (increase the lens opening), the amount of light will be increased. Having in mind that the lens opening is approximately a circle, we can assume that it has an area of π*(D/2)² (D is the diameter). If we increase D by √2, we will increase the area 2 times. That is known as the “f-stop”. For example, if your aperture is set to f/2.8, and you want to double the amount of light, the next “stop” will be f/2. Of course, we assume that all other settings on your camera will remain unchanged while you are changing the aperture.
The other effect that the aperture has on your photo is the so called “depth of field” (DoF). To put it simply, that is the area which will be in focus. The lower the f-number, the smaller the depth of field will be and vice versa. In other words, if you set the aperture to f/1.8, you will get a photo which has only one shallow area focused, while everything behind and in front of it will be blurred. If you increase the f-number to let’s say f/11, you will have much more of the image in focus, and the blurriness of other parts will be much less intense.
You will use large aperture (small f-number) for example when making portraits, because you want your subject to pop out, and the background to be blurred so it wouldn’t distract the viewer. The opposite case would be landscape photography, where you want to have as much depth as possible in focus, so you will need small aperture (large f-number).


ISO
ISO is a measure of a sensor sensitivity, i.e. how much light does it need to create a properly exposed image. ISO is usually expressed in hundreds, e.g. 100, 200, 400, 800, 1600, 3200… On modern cameras ISO can go as low as 50, or as high as several hundreds of thousands. Same as the shutter speed and the aperture, the ISO change also has two effects on the photo.
The first effect is the brightness of the image. When you double the ISO (without changing any other settings), for example from 400 to 800, the image will be twice as bright. On the contrary, when you lower the ISO e.g. from 200 to 100, the image will be two times darker.
The second effect is the quality, or better said, the amount of noise in the image. When the ISO goes up, so does the digital noise, and your photo loses its quality.
Balancing the triangle
Having said all of this, it is clear that a photographer has to balance between these three factors in order to create a photo which is properly exposed, with as less noise as possible, and without any unwanted blurriness. If you have a quick shutter speed and a narrow aperture, you will need high ISO. If you have low ISO and quick shutter speed, you will need a large aperture. If you have a narrow aperture and a low ISO you will need a slow shutter speed. Or to put it a bit differently, if you want a high ISO and a wide aperture, you will need a quick shutter speed, and so on…
Let’s go through some examples…
Example 1: You are photographing a bird in flight on a sunny day. You want to freeze the motion. You have to use quick shutter speed, but you can open your aperture to let more light in (and also to have only the bird in the focus, without the background), so you can leave ISO on a low level.
Example 2: You are photographing the same bird, but on a cloudy day, or in the dusk. Even though you have opened the aperture, there is still not enough light. You will need to raise the ISO so you will get the well-exposed photo, and you will have to learn to live with somewhat higher noise.
Example 3: You are photographing a beautiful landscape on a sunny day. You set a high f-number so that you can have as much of the photo as possible in focus. You also want to have low ISO in order to have a high quality image. Therefore, you might need somewhat slower shutter speed so that enough light can get to the sensor.
Example 4: You are standing on the overpass above a highway in the night and you want to capture the cars’ light trails. You will need a slow shutter speed (maybe 20-30 seconds), and a low ISO so you won’t have much noise. Your aperture can be somewhere around the half, which will give you the best image sharpness.
Example 5: You are making a portrait of your kid inside your house. You need a large aperture opening to make your kid stand out, and somewhat faster shutter because kids cannot stand still. Since you are indoors and there is not enough light (and you have also set quick shutter speed), you will set higher ISO to compensate for it.
Hopefully you have a good overview of these three main factors and now you know how each of them affects the photo you’re making. In the next post we will talk about different camera settings which will let you control these factors in different ways. After all, your goal is to stop using the automatic mode on your camera, because it is destroying your creativity and freedom.
See you soon, and don’t forget to share this post and to leave a comment, I’d love to hear from you 🙂

Pingback: Different Shooting Modes – Vladimir Tomić Photography